1. Recording air pressure and airflow
3. Using the airflow equipment
5. Measuring air pressure and airflow
1.
Recording air pressure and airflow
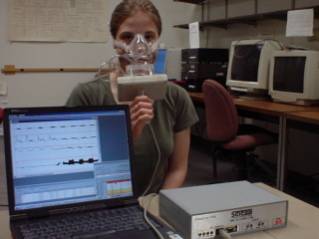
The UCLA Phonetics Lab has equipment to record the airflow from the mouth and nose. In addition, it can record the pressure of the air in the front of the mouth and in the pharynx. The system is illustrated in Figure 1. It consists of a data acquisition system (small box at the bottom left of the picture) connected to a laptop or desktop computer (bottom right), and an assembly with oral and nasal masks and pressure tubes held by the speaker, together with a microphone that records the sound.At the UCLA Phonetics Lab, we have the equipment shown in Figure 1 (oral and nasal masks, analysis box, and tubing), as well as a Rothenberg mask.Any of these masks can also be used with the 4-channel CSL box, but this set-up will not be discussed here.
 |
The mask for capturing
the oral airflow fits around the mouth and below the jaw. The nasal airflow
mask is fastened over the nose by a band that goes around the head. Both
masks are joined to the assembly by small tubes. The masks can be used
either together or independently (though the oral airflow apparatus must
be present, over the mouth or not, in any set-up, since it contains the
pressure transducers).
Some notes on connecting
the assembly:
![]() Make
sure the tubes for pressure and flow are placed over the corresponding
pressure and flow ports.
Make
sure the tubes for pressure and flow are placed over the corresponding
pressure and flow ports.
![]() The
nasal mask has only one tube. This should be placed over the flow port.
(There is no nasal pressure to be measured.)
The
nasal mask has only one tube. This should be placed over the flow port.
(There is no nasal pressure to be measured.)
3.
Using the airflow equipment
Recording the airflow:
![]() While
talking, press the masks firmly against the face, making sure that there
are no leaks.
While
talking, press the masks firmly against the face, making sure that there
are no leaks.
![]() To
record the pressure of the air in the mouth, hold a small tube between
the lips while speaking. (If the tube is small enough it will not interfere
too much with speaking.)
To
record the pressure of the air in the mouth, hold a small tube between
the lips while speaking. (If the tube is small enough it will not interfere
too much with speaking.)
![]() The
pressure of the air behind a velar closure can be measured using a small
tube passed through the nose, with its open end in the pharynx. However,
this will not be discussed here.
The
pressure of the air behind a velar closure can be measured using a small
tube passed through the nose, with its open end in the pharynx. However,
this will not be discussed here.
Tips
for recording:
![]() When
recording air pressure in the mouth, it is important to keep the tubes
free of saliva. The tubes should be blown clear at frequent intervals.
When
recording air pressure in the mouth, it is important to keep the tubes
free of saliva. The tubes should be blown clear at frequent intervals.
![]() If
you want to record the changes in pressure and flow that occur as a result
of the vibrations of the vocal folds, you will need to use tubes with an
internal diameter of at least 2 mm.
If
you want to record the changes in pressure and flow that occur as a result
of the vibrations of the vocal folds, you will need to use tubes with an
internal diameter of at least 2 mm.
The data can be analyzed
using the Macquirer or PCquirer software (or CSL).If
the acquisition box is connected to a computer running Macquirer or PCquirer,
the program will automatically display the data, as shown in Figure 2.
Figure 2 has three records
made of "He paid the price ", with the emphasis on the second
word.
![]() The
top display (Audio) is the record produced by the microphone. The sound
is a little distorted due to muffling from the mask, but it shows the number
of syllables and which ones are relatively weaker or stronger.
The
top display (Audio) is the record produced by the microphone. The sound
is a little distorted due to muffling from the mask, but it shows the number
of syllables and which ones are relatively weaker or stronger.
![]() The
second display (Oral flow) shows the bursts of air due to the aspiration
of stops.It also shows variations
in flow due to vocal fold vibration.
The
second display (Oral flow) shows the bursts of air due to the aspiration
of stops.It also shows variations
in flow due to vocal fold vibration.
![]() The
third display (Oral pressure) shows the increase in the pressure of the
air in the mouth for each of the stops. It also show the variations in
pressure associated with vocal fold vibration.
The
third display (Oral pressure) shows the increase in the pressure of the
air in the mouth for each of the stops. It also show the variations in
pressure associated with vocal fold vibration.
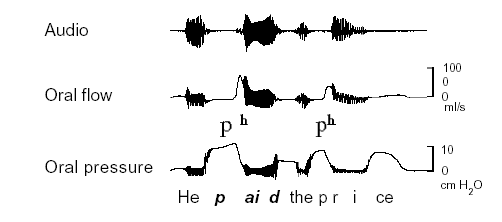 |
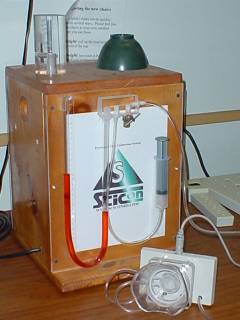
To quantify the differences between sentences, we can measure the airflow and pressure data using scales such as those shown on the y-axes in Figure 2.The unit for airflow is milliliters per second (ml/s), and the unit for pressure is centimeters of water (cm H2O).
Flow is measured in terms
of the volume of air that passes a given point in a second (ml/s). To make
sure that your data is measured in standard units (ml/s or cm H2O,
rather than in the volts that the transducers actually measure), it is
necessary to calibrate the equipment (especially if the equipment has been
recently moved). Calibrating the rate of flow requires an apparatus like
the one shown in Figure 3. A fan produces a steady stream of air that flows
through the mask and then on through a special flow calibration tube.The
tube contains a ball that is blown higher in the tube as the flow is increased.In
the UCLA Phonetics Lab, this apparatus is part of a wooden calibration
box stored with the aerodynamics equipment, as shown in Figure 3.
 |
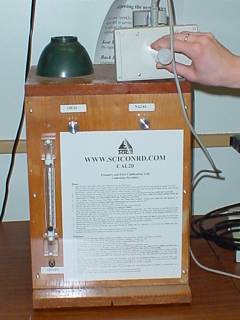
Pressure is measured as the force required to raise or lower the height of a column of water by a certain amount. In terms of oral air pressure, this corresponds to how much effort you would have to use to blow bubbles out of a tube immersed in water.
To ensure standard units, the system can be calibrated with the U-tube shown in Figure 4. When the tap is open, the tube can be filled with water to the zero level, with the water level reaching the same height in both branches. The figure shows what happens when the tap is closed and pressure is applied by pushing the syringe down. In this case the level has gone up by 5 cm on the one side and gone down by 5 cm on the other side, so that the pressure being applied is 10 cm H2O.This apparatus is also found on the wooden calibration box in the UCLA Phonetics Lab.
 |
The
information on this page has been adapted from the forthcoming book,
Phonetic Data Analysis: An
introduction to phonetic fieldwork
and instrumental techniques by Peter
Ladefoged.For more information
on aerodynamic techniques, refer to this book.
This
page was created by Rebecca Scarborough and Christina Esposito. Last
updated June 2003