| Palatograms | Making Midsagittal Diagrams | Practical Points |
| Linguograms | Making Tomographic Slices | References |
| Making Dental Alginate Impressions | Superimposing Contour Lines |
![]()
 When this has been done, the marking medium on the tongue will have been
transferred to the upper articulator. Insert a mirror whose corners
have been rounded, and which is wide enough to reflect both the left and
right upper molars (50-60 mm) into the mouth, and use it to view and photograph
the place of articulation.
When this has been done, the marking medium on the tongue will have been
transferred to the upper articulator. Insert a mirror whose corners
have been rounded, and which is wide enough to reflect both the left and
right upper molars (50-60 mm) into the mouth, and use it to view and photograph
the place of articulation.
Once the articulation has been photographed, ask the
speaker to rinse out his or her mouth. If a video camera is used,
the image can be transferred directly to a computer for further processing
as described in “How
to Capture Video for use on the Mac.”
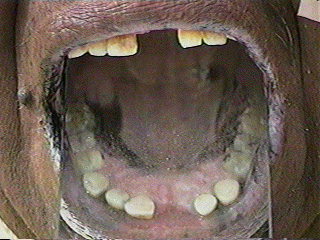
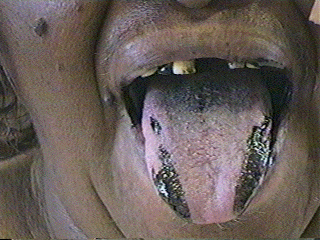
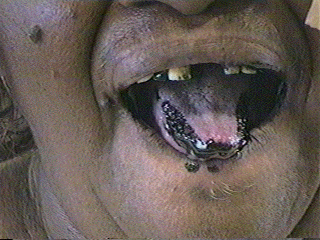
Palatograms and linguograms are shown in Figures 1
to 3.
|
|
|
| Fig 1: Palatogram; still image digitized from video. Orientation: Upper teeth are shown at top and reflected in the mirror at bottom. | Fig 2: Linguogram showing tongue blade and body contact. | Fig 3: Linguogram showing tongue tip contact and sublaminal contact (contact under the tongue.) |
Note that in both kinds of photographs the black contact
areas reflect the sum of the articulatory contacts that occurred in the pronunciation
of the word investigated; they do not show the tongue’s position at any one
particular moment. In addition the photographs of the tongue usually
show it when it has been slightly stuck out of the mouth, and is therefore
not in the same shape as it was when producing any of the sounds.
Chromatic dental alginate has different color phases during mixing (purple), setting (pink), and set (green), which makes timing while mixing and setting unnecessary. The easiest way to make an alginate impression is to mix a sufficient quantity place 3 or 4 tablespoons of powdered alginate in a flexible plastic container and gradually add water while stirring, until the mixture turns from purple to pink and a thick paste results. Gather the alginate in a plastic scoop and transfer it to the end of a palatography mirror. Ask the speaker to lean slightly forward so he is looking at the floor and breathing through his nose, and while the alginate is still in its setting phase (pink) carefully place the mirror and mound of alginate into the speaker’s mouth. Instruct the speaker to bite down on the mirror until it is firmly pinned in the occlusal plane between the upper and lower teeth, to continue breathing through the nose, and Press the mirror firmly against the upper teeth, to allow some of the material to flow out of the mouth around the upper lip. INSERT PIC. A good impression for phonetic purposes should be made with sufficient material to indicate (at least roughly) the shape of the upper lip and the curvature of the soft palate. The palate will, of course, be in a lowered position, as the speaker will have been breathing through the nose while the impression material is setting. The impression material around the lips sets slightly more slowly than that inside the mouth, where it is slightly warmer. When the alginate has set (turned green) you can see that the material around the lips is firm, it is quite safe to ask the speaker to gently remove the impression by rocking the mirror remove the mirror from the mouth, first rocking it back and forth, and raising and lowering it slightly, so as to break the seal. Then ask the speaker to rinse his mouth several times to remove any remaining alginate.
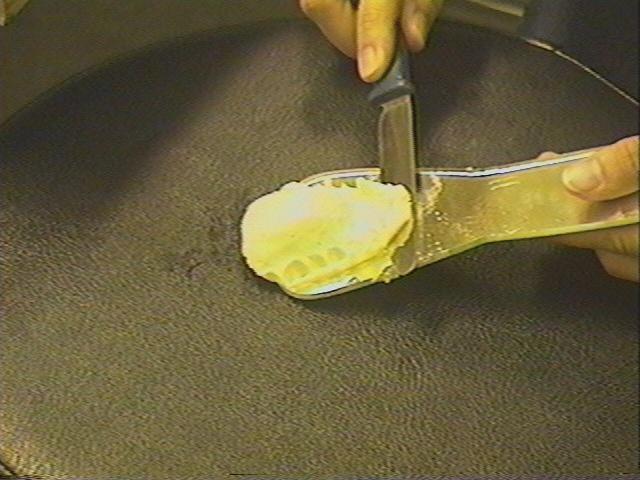
If an alginate impression is to be kept for any
length of time it must be immersed in water so as to prevent it from drying
and shrinking. Otherwise, slide it off the mirror with a flat metal
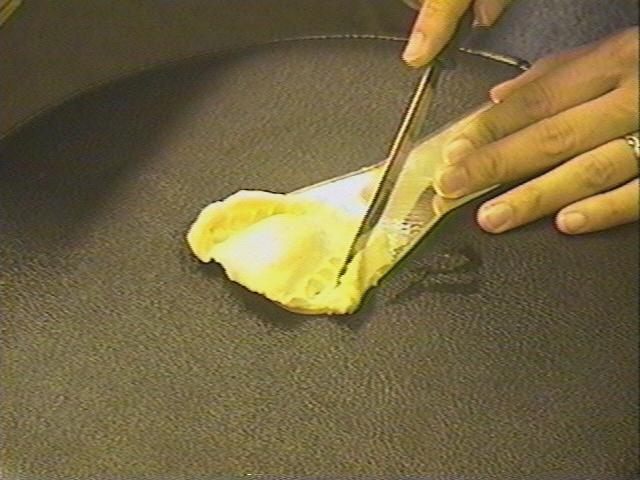
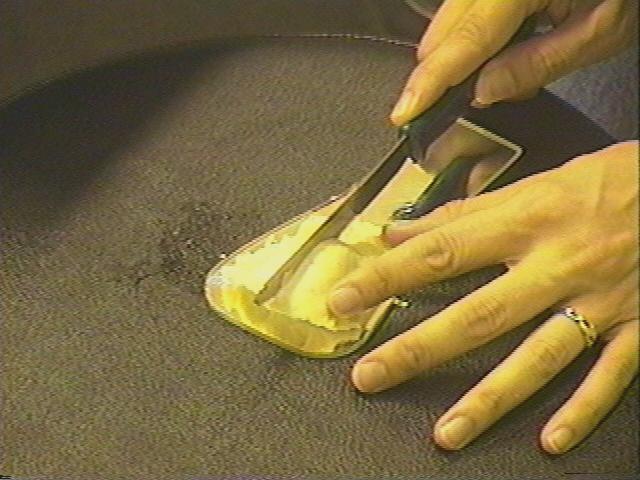
baking spatula or knife (Figure 5a.) . and trim the base flat
so that it is parallel to the plane of the teeth. If the mirror really
was pressed firmly against the upper teeth while the impression was being
made, this should involve no more than the removal of Remove excess
material from around the sides, including the negatives of the teeth.
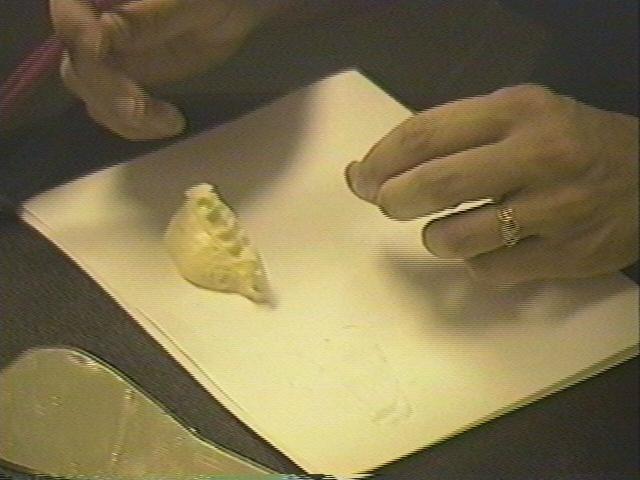
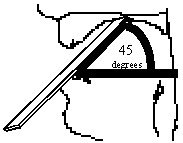
(Figure 5b.) The impression may then be cut in half in the mid-sagittal
plane (Figure 5c), and a tracing of the upper surface made, to yield a profile
image of the shape and size of the palate (Figs 5d and 5e.) The
exact positions of movable structures such as the lips and the soft palate
have to be estimated, but if care has been taken to have sufficient impression
material around the lips and as far back in the mouth as possible, the sagittal
diagram will be reasonably accurate. Palatograms should always be accompanied
by diagrams of this kind, as in the illustration ***** PL please supply.
It has long been established that sagittal sections provide the most useful
representations of speech sounds.
|
|
|
| Fig. 5a | Fig. 5b | Fig. 5c |
|

|
|
| Fig 5d | Fig 5e |
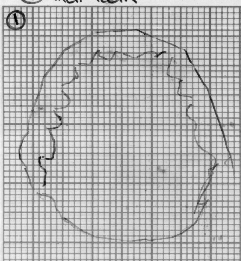 . Next, bisect the impression in the coronal plane, at a point about
the middle of the impression (usually between the second premolar and first
molar.) insert pic of doing this. The intersection of these mid-sagittal
and coronal cuts can be used to define x and y axes and an origin on a piece
of graph paper.
. Next, bisect the impression in the coronal plane, at a point about
the middle of the impression (usually between the second premolar and first
molar.) insert pic of doing this. The intersection of these mid-sagittal
and coronal cuts can be used to define x and y axes and an origin on a piece
of graph paper. 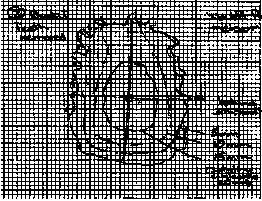
 The scaling can be done quite easily if the photograph has been entered
into a computer, either by scanning it, or by conversion from the video.
The contour lines, location of the teeth and the tracing of the sagittal section
can also be scanned in, and then the image of the roof of the mouth scaled
independently in each direction so that obvious landmarks, such as the distance
between certain teeth are adjusted appropriately.
The scaling can be done quite easily if the photograph has been entered
into a computer, either by scanning it, or by conversion from the video.
The contour lines, location of the teeth and the tracing of the sagittal section
can also be scanned in, and then the image of the roof of the mouth scaled
independently in each direction so that obvious landmarks, such as the distance
between certain teeth are adjusted appropriately. When doing palatography, one should allow the speaker to practice the task extensively. It is important to get the speakers to relax after the tongue or upper surface of the mouth have been painted, so that when they say the word being investigated they do so naturally. It also requires practice to stick the tongue out of the mouth the same way every time. It is obviously important to date and label the photographs as soon as they are taken. In addition, again as with all instrumental data, it is preferable to make records of several different speakers saying a few utterances rather than one or two speakers repeating a large number of different utterances. Ideally one would like to get a dozen speakers of the same dialect each repeating a dozen times all the contrasts to be investigated. But making palatographic records is fairly time consuming, and in a world in which time and effort are limited one may have to be satisfied with half a dozen speakers saying each word once. We hope, however that gone are the days when phoneticians such as Ladefoged made general statements about some West African languages based on the palatographic records of a single speaker of each language. We need to find out the properties of the language that a group of speakers have in common, rather than the details of an individual’s pronunciation.
[Adapted from:
Ladefoged, P. (1997). “Instrumental techniques for linguistic phonetic fieldwork.”
In W. Hardcastle and J. Laver (Eds.), The Handbook of Phonetic Sciences Oxford:
Blackwell Publishers.
and from:
Anderson, V. (in progress) “Connecting Phonetics and Phonology: Evidence
from Western Arrernte”. UCLA Ph.D. dissertation.
![]()
| Return to top of this page | Return to Facilities |